|
I hope you found my last post about Embroidery Stands helpful, in this tutorial I'm going to give you step-by-step instructions on how to frame up your fabric on a roller frame (or a slate frame) ready for stitching! Why do I need to use a Frame? It's best to work your embroidery with the fabric stretched taught in a frame. This makes it easier to stitch and it prevents the fabric from distorting and puckering. When the finished piece of embroidery is framed in a picture frame, the fabric will also be stretched taught, so if you work the embroidery with the fabric stretched taught then it will look exactly the same when you then put it in the picture frame. Fabric, unlike paper, has a mind of it's own, so it is necessary to control it, otherwise it really will do it's own thing! Roller Frames Vs Hoops Hoops are great for small, quick projects but the downside is that:
 Step 1 - Iron the fabric! Sorry! It really is best to iron the creases out of the fabric before you begin, at least the worst ones... Small creases disappear when the fabric is stretched, but they reappear when you take the fabric out of the frame :o( This isn't too terrible, as long as you're going to stretch the finished embroidery over card and put it in the frame, smaller creases should disappear again. The one thing you don't want to do, however, is iron the creases out once you've done your embroidery - all your lovely stitching will be squashed! If you have a Jacobean Rainbow Kit, which is printed on linen, you'll need to have the iron set on linen, or triple dots (the highest setting), and you'll need lots of steam, a water spray or a damp press cloth as it's hard to get the creases out of linen. I recommend ironing from the back of the work, that way if there's any goop on the iron then it won't affect your finished piece. Step 2 - Sewing your Fabric to the Rollers If you're working a Jacobean Rainbow Kit, your printed fabric will sit landscape-wise within your frame. You'll need:
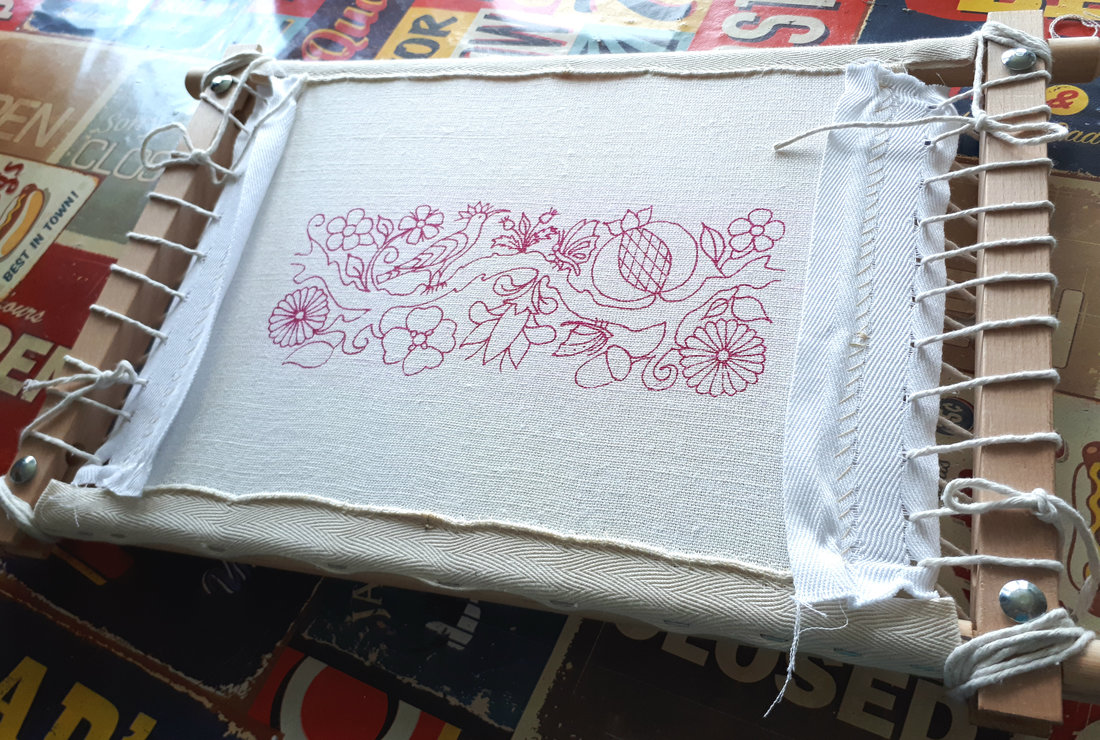
Counter- Intuitive Warning - the next step is counter-intuitive! 4. Lift the tape on the roller up slightly, and match the mark on the tape to the mark on the fabric - with the raw, folded edge trapped in between - and pin it. If you do dressmaking or soft furnishings this will seem really odd! 5. Pin all the way from the centre to the right hand side, and then all the way from the centre to the left hand side. The tape, pins and edge of the fabric will all stick upwards! 6. Take a long piece of your extra-strong or buttonhole thread (from your thumb to your armpit, plus a little bit), and run it through some wax (if you have it). This strengthens the thread a little bit and will help to stop it from getting knotted up. 7. Starting in the middle of the tape (this stops the fabric shifting too far to the left or right as you stitch), you're going to start stitching the fabric to the tape. You can start with a knot, and then work a cross stitch to begin, and then a second cross stitch over the top (see photo below) 8. Stitch along the tape to the left, removing pins as you go. You're going to oversew the fabric to the tape, alternating the depth of the stitches 3mm/5mm. Do this by pushing the needle through the tape and fabric from the tape side and drawing the needle and thread through. Then shift to the left about 3mm and push the needle through the tape and fabric from the tape side and drawing the needle through - the thread will loop over the top and then be drawn through, leaving a straight or slightly diagonal stitch, perpendicular to the edge of the fabric. The stitches should have the same spacing left to right, but be different lengths (3mm/5mm) up and down - see photos. 9. When you get to the end of the tape, go back over your stitches for about an inch (2-3cm), and then secure the thread with a couple of tiny back stitches. (see photo) 10. Repeat steps 7 - 9 working from the middle to the right. 11. Repeat steps 1-10 to stitch the other side of the fabric to the other roller - if your Feline Overlord will allow it, of course! Step 3 - Securing the fabric to the side bars Now you need to assemble the frame, sew some tape onto the vertical sides of the fabric (the short sides if you're working a Jacobean Rainbow Kit), and then lace the tape to the side bars of the frame with some string. After that you'll tension your fabric so it's as tight as a drum! 1. The first thing you need to do is put the rollers into the sidebars and assemble the frame. It's best to do one roller at a time, and push the roller into the sidebar at each end. Once you have one roller in place, twist it so that the fabric hangs slightly inside the frame. Then put the second roller in position at both ends, before pushing one end, and then the other into the side bars. This can be a bit of a struggle, so you might need some help if you don't have a lot of strength in your hands. 2. Tighten the wingnuts on the side bars at either end of the bottom roller. Twist the top roller back so that the fabric is tensioned and then secure the wingnuts at either end of the top roller. 3. Sewing tape onto the vertical sides of the fabric. You'll need:
5. Take a long piece of your extra-strong or buttonhole thread (from your thumb to your armpit, plus a little bit), and run it through some wax (if you have it). This strengthens the thread a little bit and will help to stop it from getting knotted up. Counter- Intuitive Warning - the next step is counter-intuitive! You're going to stitch the tape onto the fabric with horizontal stitches, 1cm in from the edge of the fabric (not the tape). You may want to mark a double line on the tape to keep your stitching straight - you don't want to get too near the edge of the fabric, or the tape will come off when you lace it, and you'll have to start again. 6. Secure your thread at the bottom of the tape, with a couple of horizontal back stitches. Make sure that your stitches are 1 cm in from the edge of the fabric - you'll need to turn the frame over to check - see photos. 7. Take a stitch, about 1cm above these holding stitches, and about 1cm wide, picking up the tape and the fabric. Repeat this stitching, all the way to the top of the tape. Secure the thread with a couple of back stitches. The stitching may cause the fabric to tunnel (form a ridge), but this doesn't matter. Lacing the fabric onto the frame To keep the fabric taught from side to side, you need to lace the fabric onto the sidebars of the frame. You'll need:
8. Keeping the roll of string attached, pull a long piece of string out and thread the needle. 9. Starting about 1" (2.5cm) from the bottom of the tape, take the needle through the tape only (not the fabric) from the topside, and draw through the string. Bring the string up on the outside of the roller frame and take the needle back down through the tape about 1" (2.5cm) above the previous stitch, from the topside, so that you loop the string around the side bar. Repeat this all the way to the top, pulling more string off the roll as you need it. You'll need a long length (about 50cm) to secure the string at each end (you can now cut the roll of string off!). Tensioning the fabric Next you're going to tension the fabric by tightening the rollers and pulling up the lacing. 10. Start by pulling up the string to take any slack out of it. 11. Secure both ends by wrapping it around the 'corner' of the frame a few times (see photos) 12. Finish by tying a slip knot to one of the strings 2 or 3 inches from the bottom of the tape. To tie the slip knot, thread the string around one of the lacings, creating a circle. Then form a loop in the working part of the string, and push it up into the circle. Pull the loop to tighten. Pull the free end to release the knot. 13. Tighten the rollers by loosening the wing nuts on the top roller, and twisting the roller back to put more tension onto the fabric. The frame might creak, but that's okay! Tighten up the wingnuts without releasing the tension on the fabric. 14. Release one end of the string from the sidebars - pull the slip knot out and unwind the string from the corner. Starting at the opposite end pull any slackness out of each lacing and work your way down to the free end. Keeping the tension in the free end of the string, repeat this, taking more slack out of the string and then secure it by wrapping it around the corner and tying a slip knot. 15. Repeat step 14, with the other 3 corners. Keep working sequentially around the frame until the fabric is tight as a drum! Checkout this demo video: 16. Ta Da! You're now ready to start stitching!
Tip - Keep your work clean and dust free, by storing it in a pillow case.
3 Comments
10/12/2019 09:32:03 am
Dressing up is not really my thing, but I am willing to try it every now and then. Well, my girlfriend always gets mad at me for now working out, and I just want to make her happy. I know that I can be pretty good looking when I try to, and that is what I am planning on doing this weekend. I just bought a new suit and I hope that she likes it. I know that I can look good at times. 8/27/2021 12:55:48 pm
Handling a poultry farm is not an easy task. Just the preparation is hard enough, but having to do a number of daily tasks is just exhausting. However, it is all satisfying, since at the end of it all, you gain a lot of money for doing it. The only problem is the distribution. Eggs are very delicate, they need to be kept in a decent storage on to be traveled virtually unscratched. This egg mobile you have been designing seems to be really ideal. Leave a Reply. |
Tara Dakini Archives
December 2019
Categories |
 RSS Feed